
I haven’t had the time for image critiques in the last many months, so no time like the present to get one done! JC, a new hobbyist photographer, sent me a series of images for critique last week and asked me to choose 5 from the set. He isn’t using pro level equipment, he has an advanced point and shoot. He shoots mainly in auto or program mode, so the camera is doing most of the guessing work.
So in no particular order, here are some critiques 🙂 (titles by me hehe)
1- Clawed sunset

The most obvious issue with this image is the lack of sharpness. This is probably due to the low light time of day the image was taken. A bit of digging and the shutter speed was 1/3 of a second, which is very slow for hand holding. When shooting in low light, make sure you are using a tripod for maximum stability. If you don’t have a tripod, look to lean the camera on a pole or put it on a table. You can also look at increasing the ISO (meta doesn’t show the ISO used). A higher ISO, while it will negatively impact the image quality, will increase the shutter speed.
Watch out for the lines in the image and making sure they are straight. Buildings that are crooked give the image an odd tilt. You can turn on the guidelines in the camera’s viewfinder and use those to help align things straight. If not, look at using software to make them straight in post processing.
I don’t mind the trees in the bottom as having something in the foreground adds depth, the buildings are a bit of a distraction. If the sun with claws is your subject, make sure that it really sticks out.
2- Blue Hour Cityscape

First, what is blue hour? It is that time of day that the sun has set enough that the lights are on in the city, but there is still some light in the sky. This is a great time for making some night photos.
The same issue with low light and sharpness as the first image. Even if the shutter was slower (1 second), seems that you were able to keep steady a bit more for a slightly sharper image.
I’m assuming the subject is the mix of the buildings and the light reflections. If so, watch for distracting foreground elements as we see in on the bottom left and middle of the frame. Recompose to eliminate those. Even that little wave in the water cuts the tranquility.
The image also seems a bit under exposed, which is a common problem with shooting automatic in low light. With some sharpness and a little boost of exposure, the image will pop more. Look at shooting in P or in Aperture priority mode and add some exposure compensation. Or, in a perfect world, shooting in Manual exposure and set it yourself.
When you start controlling the aperture in camera, a wide open aperture is great for backgrounds and creating depth of field (making things selectively blurry). When shooting cities, you should aim for an smaller aperture, around f/11 – f/16 to get a nicer image. However, having such a small aperture will make your 1 second exposure into an 8 second exposure, so again, a tripod or stable surface is a must.
3- Tagged wall

I love images that have a bunch of visuals in them.
I’m sensing a trend of watching the rest of the frame to ensure that distracting elements are eliminated. I question having the bottom third of the image with the broken windows. The windows are cut in the frame making the image feel incomplete. Depending on what is higher up on the building, I would remove the whole bottom third and use the horizontal pipe as being towards the bottom of the frame (but not all the way at the bottom).
This is where a bit of processing can go a long way. Boosting a bit of contrast and some saturation can make a huge difference in the image.

This is the type of scene that I would shoot from multiple angles. Wide (such as JC did) and then get in close and see about picking out some details and getting creative.
4- Window Smoker

What a great street photo find!
The angle is the first things that seems off. When doing some street photos, you usually aim to get the subject’s face a bit clearer. I would of loved to shoot this from the other side so she is looking more towards you / into the frame. In the selected angle, watch all elements in the scene, specially with that light. If you chose to include it (personal choice, I wouldn’t), make sure it isn’t cut. If you have it in the frame, notice that it is such a dark element that will draw the user’s eye, so watch it’s placement in the frame.
With this scene, seeing the three windows up top, I would of tried shooting this straight on and have the three windows symmetrical in the frame. Even waiting until she turns a bit to look more towards the camera.
5- Ze Church

Ahhh.. a classic situation where your camera just can’t capture the scene as your eye sees it. And upgrading cameras won’t really help.
The problem here is a bright sky and a dark foreground. Your camera cannot balance the two in a single frame. This is where many people shoot an HDR image (High Dynamic Range), which in essence takes multiple images at different exposures and blends them together. The problem is that many people overdo their processing and make the images look fake.
In this situation, you need to decide what you want properly exposed if you are shooting a single frame. What is the subject? The top of the church? The sky? If it’s the church, make sure you are exposing for that. If you are in manual, it is easy to adjust (slower shutter or wider aperture in this case). In auto modes, see about upping the exposure compensation so that the camera sees the scene and you tell it to add +1 (or 2 or 3) levels of exposure / brightness.
There is alot of information to see in the frame, and contrary to the Tagged Wall, I’m not sure it works. Look at recomposing to eliminate some of the background elements, mainly the ones on the left.
The main thing to remember here is that when you chose your subject, make it obvious in the frame. We often take the photo to just capture what we see. It looks like a standard vacation snapshot. Think of someone standing by the Eiffel tower where they are small in the frame to get the whole tower in there. Get in close to the subject, put their face on one side of the frame and the tower on the other. You can rarely have multiple prominent subjects in an image, so you need to make a choise.
To sum up… starting off in photography seems daunting. Select a few things to improve on each week/month and work on those. Then move to something else.
I’d suggest when taking an image, don’t just look at the main subject in your viewfinder, but have a look around before hitting that shutter button to make sure there aren’t extra elements you don’t want in the frame.
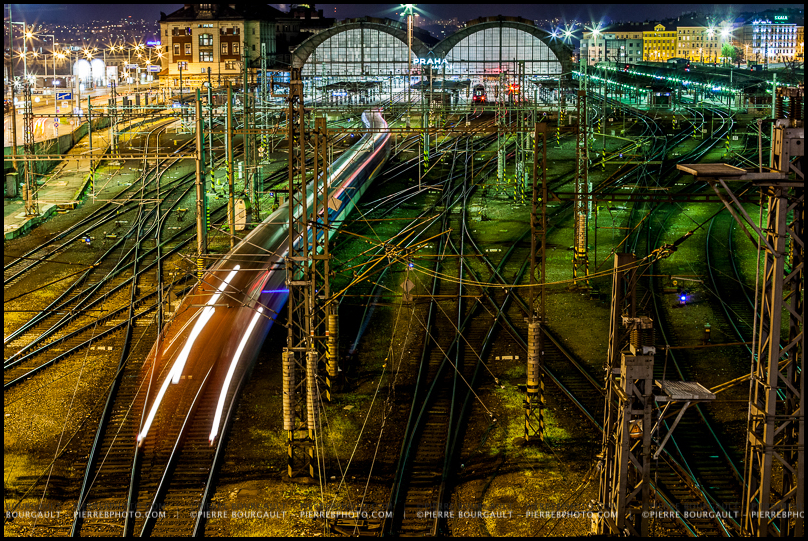
Look to keep the camera stable when shooting in lower light. Or up the ISO if hand holding. You can get a great night image without a tripod. The image below I took in Prague at night, without a tripod. I used part of the overpass to rest the camera and had the 2 second timer on to ensure my clicking the button wouldn’t shake the camera. I did have to cut on framing as I couldn’t move the camera, so did the best with what I had.
Thanks for sending in the images JC and allowing me to make a public critique! 🙂
If anyone else would like some images reviewed, feel free to send me a collection of 5 images, in a decent quality please 🙂
Want to read some other critiques? HERE they are.
*All images are copyright by their owners, please do not use or reproduce without permission*